Wednesday, January 30, 2013

Home made Soy Milk

For the past few days, I've been slaving myself because of my craving for some soy milk. The soy milk they sell in the local department store doesn't seem to compare to the soy milk I grew up drinking back home. The soy milk here taste like a whole bunch of chemical was added into it, AND I could taste the soy bean skin, which and most probably wasn't peeled before they ground it up and boil it.

I only made Soy Milk 3 times in my lifetime, the first one was a success, a complete dupe of the authentic soy milk they sell back home. Unfortunately, the other one was a bust, why you may ask? I did not peel the skin of the soy bean which produced an awful smell, and taste. This was the time I knew that most of the brands they sell in the large department stores are not peeled, or isn't completely peeled anyway.

This recipe I must admit is quite easy on the pocket. And doesnt taste like any store bought soy milk out there. Here in the US anyway. I bought a big bag of Soy Beans in a Chinese grocery for $3. And you'll only need about 1/3 of the bag for half a gallon of Soy Milk.

**If this is your first time tasting this kind of Soy Milk just try to make a small batch**

Place 5 Cups of Soy Bean in a large container filled with a lot of water. Soak the Soy Bean overnight, and you will notice they expanded twice their original size. Discard the water and fill with clean water again.

Soaked overnight.
This comes the meticulous part. I would suggest doing this when you're bored and have a couple hours to spare. Think movie marathon? Or even better... FRIENDS marathon.

Peel the skin from the bean, you just basically pinch them and the Soy bean will pop out. Once you get the hang of this, its pretty easy... I said easy not fast... It took me 2-3 hours to peel them and I didn't even get them all, which my OCD self was screaming inside, but my fingers were tired... and wrinkly. Although time passes by when you're watching some FRIENDS episode and laughing at Ross.

Constantly discard the water when its starts looking white-ish and you starts smelling a beany smell. Don't worry if you crush or split the bean in half, this actually makes things easier to spot.

Look at all those skins.
Discard the skin and some beans that didn't expand or take in water. Don't worry about not peeling ALL of them, its nearly impossible unless you have some Asian army behind you, I left mine back in Japan, so its my bad-luck. That's my mom and sister by the way. They are all the army I need.

Place 2 cups of soy bean in a blender with 3 cups of water and transfer them to a deep pot. Do this until all the bean are pulverize. Place about 2 L of water and let it come to a simmer, remove the foam on top.

Be very careful with this, it tends to over boil and flow out causing a BIG mess in your kitchen. so Stir...Stir...Stir...

Add 3-4 Tbs of DARK BROWN SUGAR and 1/2 Cup of milk. But you can always adjust the sweetness to your preference. Taste the soy milk and if it pleases your fancy. Turn the heat off and strain it with a CHEESECLOTH placed on top of a strainer over a pitcher. Please don't just use a fine strainer, it just doesn't work as well as even I would hope.

If you're happy with the taste you can just wait to let it cool and place it in the refrigerator,

If its too bland: Reboil the soy milk in a clean pot until it reduce to the desired taste.
If its too strong: Just add some water to suit your taste

Pork Anyone?

There are days when I want to be grand in the kitchen but yet become very lazy to do so... Therefore, I tried working on my plating skills which is improving, if I may say so.... I've been in the process of making some homemade soy milk and feeling like the Asian girl that I am, I just had to pair it with some Chinese Braised Pork Belly. All I needed was to learn to make some Mantou bread and (maybe?) some Chinese grandma out there might be proud of me. But before I harness all other Chinese culinary technique, Ill settle for this tonight.


Ingredients

1    Slab of Pork Belly
2    Tbs Vegetable Oil
1    Cup Soy Sauce
3    Cup Water
3    Tbs Xiao Shing Wine
3    Tbs Dark Brown Sugar
5    Cloves of Garlic
3-4 Star Anise
6    Peppercorn
1/2 Tbs of Garlic Powder
1/2 Tbs of Onion Powder


Cut the PORK into 3-4 equal portions. Depending on the size of your slab. OR you could always cut the pork into cubes if you so desire.

In a deep pot, add the VEGETABLE OIL. When the oil is hot, sear the pork skin side down.

Add the GARLIC, SOY SAUCE, SUGAR, XIAO SHING WINE and WATER.

When the sauce begins to boil, add all the remaining ingredients. Bring to boil.

Put the lid on and reduce the heat to medium low.

After 2 hours. Ladle some of the sauce to a medium sauce pan and add 1 tbs of FLOUR mixed in 1/2 a cup of WATER to thicken. Stir for 3 minutes.

**All the ingredients here can be customize to fit the diners palate. So feel free to be a loosy-goosey on this one**

Serve on a bed of white rice and sprinkle some scallions or green onions on top.

Friday, January 25, 2013

Roasted Chicken

It seems like there is a concept of roasting a chicken as a daunting task. Reserve for special occasion that  calls for a "difficult" recipe. However, roasting a chicken in the oven is far from that. In actuality it is one of the easiest recipe I have ever done. No need to stay in front of the stove, stirring continuously. Once popped in the oven, you just leave it. Unless you want some sides. Although this recipe also takes care of that cooking in the oven. Also, this is a one pan type of cooking which I love, since I'm the one who washes the dishes here, I always prefer one pot recipes. Allow at least 2-3 hours of cooking and prep-time for this recipe.


Ingredients

4-6 Lbs Whole Chicken
3 Medium Onions
3 Bulbs of Garlic
3 Lemons
3 Medium Size Carrot
4-5 Medium Potatoes, 
1/2 Cup Butter (Melted)
Salt and Pepper
Dried Thyme


The day you're going to cook the chicken, sprinkle it with KOSHER SALT. This actually suck some of the moisture out of the skin and flavor the skin as well. 

** Before everything, make sure the chicken cavities are cleaned.**

3 hours before dinner... PREHEAT the oven to 420-425'F

Sprinkle KOSHER SALT and PEPPER on the cavity of the chicken, Cut the GARLIC BULB, 2 LEMONS and "shove" them inside the cavity as well. Tie the CHICKEN legs with twine to pull them together. and tuck the wings under the chicken.

Dry the CHICKEN with paper towel, making sure the skin is fully dry. This will ensure that the skin will brown because excess moisture has been taken away from the skin.

**I used a 9x13 casserole dish. The pan youre using musn't be too big, this will cause most of the vegetable to burn and wont circulate the heat properly.**

Cut the ONIONS into strips and place them on the bottom of the dish, place the chicken, making sure to tuck the wings under. Peel and Cut the CARROTS into thirds and spread them around the chicken, doing the same thing for the POTATO as well. Break the GARLIC BULB into individual cloves. There's no need to peel the skins of the garlic since it will be easier to remove them once cooked. 

Cut a LEMON in half and squeeze the juices around the vegetables, sprinkle some SALT & PEPPER

For one last time, dry the chicken, brush the melted BUTTER on the chicken, the butter will also ensure further browning of the skin. Sprinkle SALT&PEPPER and THYME on the skin. And just spread the excess melted butter around the vegetables. 

Bake for an hour and 30 minutes. Using an internal thermometer make sure the chicken reach 165'F-170'F.

**If you dont have an internal cooking thermometer, it is a cooks note to stick a steak knife between the thighs and if the juices runs clear then the chicken is cooked through. This technique comes from the knowledge that the thigh of the chicken is the thickest and takes longer to cook. Although you have to make sure that you stick the knife deep enough.**

Take the chicken out from the dish and cover with aluminum foil. Letting it rest for a good 30 mins. This lets the juices mellow and prevents the chicken for drying once cut. 

Meanwhile, put the vegetables back in the oven and reduce the heat to 400. Stirring them occasionally. 

If you happen to cook the chicken too early and no ones in the house is ravishing, reduce the heat to 250-300'F and place the chicken back on the dish and cover with aluminum foil with holes in them. 

Serve and enjoy. 

Thursday, January 24, 2013

Coffee-Chocolate Cake Recipe

Ever since I've started baking I've always added some coffee or an extract of it on most of my chocolate recipe. So venturing out and experimenting to bake a coffee cake wasn't much of a task. Although, the reason for most of my measurement was in tablespoon was because I was experimenting with this recipe the whole time. But I do promise to find the time to convert the measurements into cups and refine the flavors when I make my second batch.

CAUTION: This coffee cake recipes are only for coffee drinkers, enthusiast and a-like. The taste of the coffee was pretty strong on this one. Although you can reduce the amount of coffee on the recipe.


Ingredients

Batter

10   Tbs All-Purpose Flour
8      Eggs
8      Tbs Cocoa Powder
2      Tsp Baking Powder
12    Tbs Sugar
8      Tbs Vegetable Oil
2      Tbs Instant Coffee Powder
8      Tbs Buttermilk

Prepare 4, 9 in cake pans. (Buttered and Floured) and PREHEAT the oven to 350'F

In two bowls, separate the EGG YOLKS from the WHITE. Making sure that none of the yolks breaks. 

TIP Eggs are easier to separate when cold, but you have to let it come up to room temperature before using.

In an electric mixer fitted with the whisk attachment, whisk the EGG WHITES until soft peaks forms.

Meanwhile, in a bowl, combine SUGAR, EGG YOLKS, VEGETABLE OIL and BUTTERMILK. Whisk until blended

In a different bowl, combine FLOUR, COCOA POWDER, COFFEE POWDER and BAKING SODA.Slowly pour the Dry Ingredients to the Wet Ingredients. Making sure not to over-stir. 

Fold the EGG WHITES carefully into the batter. 

Divide the batter into 4 equal parts. Bake for 20 mins or until inserted toothpick comes out clean.


Let cool in the tin for 10 mins, then carefully move the cake to a wire rack.


Mocha Frosting

1 1/2 Cup Butter
4        Tbs  Instant Coffee Powder
2        Cup Powdered Sugar
4        Tbs Cocoa Powder
2        Tsp Vanilla Extract
2        Tbs Heavy Cream


In an electric mixer fitted with a paddle attachment cream the BUTTER until pale and fluffy. 

Add the COCOA POWDER. Then add the POWDERED SUGAR 1/4 Cup at a time. 

Dissolve the COFFEE POWDER in the HEAVY CREAM. Add the coffee mixture and the VANILLA EXTRACT to the butter mixture. Whip until fluffy. 

* The Butter must come to room temperature before being whipped. 

Monday, January 14, 2013

Korean Bulgogi Fusion Recipe from Bop N Grill

The place is a fusion of East meets West. That is the exact phrase to call it, where else will you find a Bulgogi Philly Cheese steak, which I've added into my long list of foods to try. If you wanna check out BopNGrill, its in Chicago, on Sheridan Road, between Albion Avenue and North Shore Avenue.


Ingredients

Rib Eye Steak Cut thinly
One small Asian Pear
1/2     Cup of Canned Pineapple
1 1/2  Bulb of Peeled Garlic
1/2     Cup Mirin
1/2     Can Sprite
Carmelized Onion
Scallion
Salt and Pepper
Red Pepperflakes
3 Tbs   Sesame Oil
1 Tbs   Sesame Seeds

Blend everything together in a blender. Transfer everything to a big bowl with 3 cups of Soy Sauce, 4 Tbs of Brown Sugar. Add the meat, 1 sliced onions and julienne carrots.  Marinate for couple of hours or over night, which ever you prefer. 

Heat up a skillet with a 2 Tbs of oil. Set the heat to medium-high. Place at least a cup of the meat on the pipping hot skillet. * Make sure to squeeze the marinate out. Another alternative is using a colander. Toss and turn until the meat is tender. 

Serve with a small drizzle of Sesame oil, with sesame seeds and scallions. Placed on top of hot white rice.

  *This type of cooking will be very messy and prepare for splatter everywhere. I found this recipe is best to do the day you are planning on cleaning your stove. 

Chocolate Chip Recipe #1

This chocolate chip recipe was officially from Martha Stewart's Magazine, although I did change a few things. I think this is an excellent chocolate chip recipe, though I still have to try the famous Jacques Torres Chocolate chip recipe, the Martha Stewart one will do for now...


Ingredients

2 1/4 Cups All-Purpose Flour
1/2    Tsp Baking Soda
1       Cup (2 sticks) of Butter
1/4    Cup Granulate Sugar
1       Cup lightly packed Brown Sugar
1       Tsp of Salt
2       Tsp of Vanilla Extract
2        Eggs
2       Cups Semi-Sweet Chocolate


In a small bowl, mix the FLOUR and BAKING SODA. Set aside. 

Using your electric mixer with the paddle attachment, cream the BUTTER, GRANULATED SUGAR and BROWN SUGAR. Making sure the butter is at room temperature. Whip until light and creamy. 

Add the EGGS, SALT and VANILLA. Beating until well mixed.

Add the FLOUR MIXTURE, 1/4 cup at a time, then followed by the CHOCOLATE CHIPS. Making sure the mixer is set on stir or the lowest setting.

Place the bowl in the freezer (10 mins) 

Preheating the oven to 350' and preparing the baking sheet with parchment papers. 

Using an a one tablespoon ice cream scoop, drop the cookie dough 2 inches apart from each other.

* it is a baking rule of thumb, that unless stated other wise, the distance is 2 inches apart to give room for the cookies to expand and avoid over-crowding that leads the cookie dough from sticking to one another.

Bake cookies until golden brown, about 15 mins but always check your oven after 8 mins to avoid burning the cookies.

Cool the cookies on the baking sheet for 5 mins, then transfer to a wire rack. 

Store the cookies in an air-tight container to retain the moisture.

I found it the hard way that if the container wasn't air-tight, the cookie losses all its moisture and becomes really and I mean really hard. If this happened to you, preheat the oven to 200' and pop the cookies in for 5 mins to warm it up. 

Wednesday, January 2, 2013

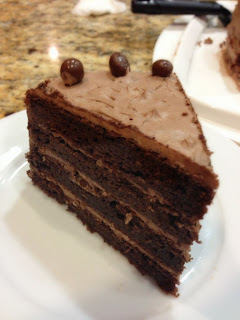
Triple Death by Chocolate

Whilst Ive been away for a semester, I have come to love baking again. Although since I was a child, I have always been in-love with pastries, I only endeavor to bake cookies, cupcakes and such. However this Christmas break I attempted to be more gutsy in the baking arena and venture in creating cakes and breads.

I ventured to find the perfect chocolate cake recipe. The recipe took me two trials that went awry. The countless eggs and flour and chocolate that was used was immeasurable  One was too sweet to be consumable, and the other the frosting never set. However, one  must learn from previous mistakes and to the blessing of the baking gods I finally made the perfect chocolate cake recipe that I will probably never reveal and will be taking to my grave.

Since I personally found the recipe with constant errors and mistakes along the way, I think I am bestowed the right to name it: Calling it a Triple Death by Chocolate Cake recipe.


The middle is filled with a chocolate buttercream filling that I experimented for the right ratio of sweetness and creaminess with a hint of fluffiness. On a personal note, I always thought baking was easy-peasy, however getting the right amounts to obtain the right textures and taste was actually harder than expected.

The frosting was done with a chocolate ganache.

There is something simply perfect with a chocolate cake. No fuss, No must... Just eat!