Monday, August 19, 2013

Glazed Chicken and Asparagus

I always had this assumption that some people believe that for a dish to be Asian, one must add either sesame oil or soy sauce, or a combination of both. Although this is false, you cant blame some people for believing this notion. I on the other hand use to detest the smell of sesame oil, especially when I was pregnant. However, everything change when my husband started asking for sesame oil to be in almost every dish. This dish was inspired by nothing more but Panda Express. I really dont know what to call this dish since I just pulled the flavor combo out of my pantry. But its always a hit in our house old.


INGREDIENTS :

2    Medium    Chicken Breast & Thighs (Fillet)
1    Bundle     Asparagus
3    Medium    Garlic Cloves
1   Small         Spanish Onion

COATING

Salt & Pepper
2   Medium Egg Whites
4   Tbs    Cornstarch
2   Tbs    Flour
1   Tbs    Vegetable oil

Cut the CHICKEN into cubes. I deboned my own chicken, but buying the fillets are completely fine.

Add the COATING ingredients in order listed above, mixing well after each addition.

Heat 1/2 cup of VEGETABLE OIL in a wok to 350'F. Place the COATED CHICKEN gently into the wok and cook until golden brown. Remove and drain well to avoid getting soggy.

** You can save some of the uncooked coated chicken in a ziplock, and just thaw them when you dont have any idea what to cook **


Hold both end of the ASPARAGUS and bend it until it snaps, discard the bottom half.

Cut the ASPARAGUS small serving sizes.

Prepare the GLAZE by combining everything, and set aside.

GLAZE
1     cup   Soy Sauce
1/2  cup   Water
2     Tbs   Mirin
2     Tbs   Honey
3     Tbs   Fresh Lemon Juice
1     Tbs  Sesame Oil
1     Tbs  Cornstarch

** You dont have to put all of the glaze but just enough to cover everything.**

Heat a pan with 1 TBS OIL, add the GARLIC and ONION until soft, then add the ASPARAGUS.

Sauté for 3-4 mins, or until the ASPARAGUS is cooked, but not too soft.

Add the cooked CHICKEN and GLAZE, lower the heat.

Turn the stove off, when the GLAZE thickens.

Serve with steaming hot rice. drizzled with some sesame seeds


!!!EXTRA TOUCH!!!

Since I fillet the chicken my self, I got to save the skin to use for garnish.

Dry the chicken really well, and deep fry them until crispy. Place on top of the dish before serving.


Wednesday, July 17, 2013

Brined Fried Chicken ala Thomas Keller

Back a several moths ago, I watched Ina Gartens' Barefoot Contessa show. There was an episode about the famous Thomas Keller and his Lemon-Brined Fried Chicken Recipe. Although I am a huge fan of Keller, I wonder if I just dont share the palate of most people about this certain fried chicken. The recipe called for a bunch of ingredients on the brine, which did not sit well with me. I followed the recipe to the core, yet it has an after-taste that wasn't so palpable. Maybe it's the ingredients that I bought, we cant all grow them in our backyard in Napa like he does. So there's the negative review, now let us move on to the more positive side of his recipe. The brine idea made the chicken unbelievably moist. The chicken recipe is the epiphany of crunchy and juicy at the same time. Therefore, with a little tweaking here and there, I found a stable, go to recipe for a simple fried chicken recipe. I provided the original Thomas Keller recipe which I do recommend everyone to try. I strongly believe its the ingredients I used, or that I must've missed something...


INGREDIENTS 

Brine : 

1       Gallon   Water ( 16 cups)

2/3    Cups    Kosher Salt
1       Tbs      Peppercorn
5       Whole  Dried Bay Leaves
1       Whole   Organic Chicken 

With 1/2 a gallon of WATER, combine all the other ingredients except the chicken in a deep pot and simmer until all the salt is completely dissolve. Add the other half of the water. Let the infused water cool. 

When the infused water cool, submerge the CHICKEN. Making sure that the chicken is fully submerge. Refrigerate over night. 

Drain, and dry the CHICKEN with a paper towel. Cut the chicken and sprinkle some SALT & PEPPER. I prefer "drying" my chicken on a wire rack after using the paper towels. 

And here is where the genius of Thomas Keller comes. The chicken coating recipe is impeccable. Although I changed the quantity of the different ingredients, it's about the same.

Coating : 

2    Cups     All-Purpose Flour
4    Tbs       Garlic Powder
4    Tbs       Onion Powder
1    Tbs       Salt and Pepper (each)
1    Tsp       Cayenne Pepper
11/2 Cups   Buttermilk

Vegetable Oil for frying


Combine all the DRY ingredients. 

Dip the CHICKEN pieces into the BUTTERMILK, then dredge in the DRY ingredients. 

Place it back to the wire rack. For easy clean-up : place the wire rack over a baking sheet to catch all the flour droppings. 

I used a deep fryer, following Kellers temperature to 330'. This could also be done in an iron skillet ( preferably ), heating 1 inch of vegetable oil. 

Fry the chicken in 2-3 batches, turning once the side is golden brown. Checking with a meat thermometer. If you dont have a meat thermometer, insert a steak knife on the thickest part of the chicken, deep enough to hit the bone. If clear liquid runs, then the chicken is done. 

To be safe and make it a little more crunchy, I place the chicken back to the wire rack with the baking sheet under and place them in the oven heated to 300-330 for 20 minutes. 

Serve the chicken while hot. Click here for some side dish ideas.


Tuesday, July 16, 2013

Strawberry ShortCake Recipe

I dont quite know how to name this recipe. An idea of making some strawberry shortcake struck me, and then I found how inconvenient storing strawberry shortcakes in Tupperware's.  So I just came up with something that resembles something like strawberry shortcakes. However, it does taste like your ol' funnel cake down at the carnival. 


Ingredients : 

11/2      Cup   All-Purpose Flour
2         Tsp   Baking Powder
1         Tsp   Salt
1        Cup   Sugar
1/2     Cup   Butter
2        Med   Eggs
2        Tsp    Vanilla Extract
1/2     Cup   Milk
2        Tbs    Sour Cream

Preheat the oven to 350' and line a 9x9 cake tin with parchment paper.

Cream the BUTTER and SUGAR with an electric mixer until pale and fluffy.

Add the EGG one at a time, followed by the VANILLA EXTRACT. 

Combine the FLOUR, BAKING POWDER, SALT in a separate bowl. 

Transfer half of the dry ingredients into the butter mixture. 

Add the MILK and SOUR CREAM. Finish with the remaining flour. 

Pour all in the prepared baking pan and bake for 30 - 35 minutes. Checking by inserting a toothpick in the center: if it comes out clean and dry the cake is done.


While you're waiting for your cake to bake, place 1 pint of HEAVY WHIPPING CREAM on the freezer for 30 minutes. And prepare the strawberry preserves. 

INGREDIENTS for STRAWBERRY PRESERVE

2-3 Cups Fresh Strawberries 
1 Cup Sugar
 11/2 Cup Water
1 Tbs Vanilla Extract
1 Tbs Fresh Lemon Juice

Cut the STRAWBERRIES in quarters .
Place all the ingredients in a deep non-stick pan.
Set the fire to medium to medium high until boiling. 
Turn the fire to low, until barely simmering. Keep stirring and remove the foaming with a  strainer.

The key to making the strawberry preserve is to keep stirring and removing the foaming. Keep at it until  thick enough. A good indication  is the back of the spoon test. : Dip a spoon and if the syrup  stick to the back of the spoon  without being too runny  then youre all set.
Let cool to room temperature before spreading it on the cake. 


Once all the prepared ingredients are fully cooled to room temperature. Cut the cake horizontally in half. 

Prepare the heavy whipping cream by whisking until soft peaks forms.

Spread the Strawberry Preserve, then the whisked heavy cream, top it off with the other half of the cake. DONT PRESS DOWN! or all the heavy cream will just ooze out. 

Place the cake on the refrigerator for 30 mins. 

Serve with a dollop of whip cream on top wih freshly cut strawberries and a scoop of vanilla ice cream on the side.


Friday, June 28, 2013

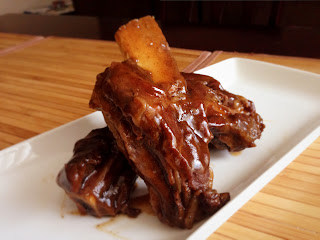
Spare Me Some Ribs

I've been looking for some authentic chinese spare ribs recipe for a while now. You know those succulent spare ribs that the ol' chinese lady brings to your table at an dim sum restaurant. After countless hours of searching the web, I still haven't found the recipe. I think I need to just muster up the courage, go down to a chinese restaurant and bluntly ask...

However, my cravings for some spare ribs still needs to be satisfied. Ah.. the debased human action of craving, gluttony to put it realistically. However, we work hard in the kitchen to receive the end result we want, so I say, to the cook goes the spoils! 


 INGREDIENTS : 


3     lbs        Spare Ribs (1.4 kg)
2     tbs        Vegetable Oil
1     dried    Red Chili

4     tbs        Soy Sauce
2     tbs        Vinegar
2     tbs        Honey
1     tbs        Sesame Oil

In a small bowl, whisk together SOY SAUCE, VINEGAR, HONEY and SESAME OIL. 

Heat the VEGETABLE OIL in a wok, add the RED CHILI and cook for about 1 minute. 

Remove the CHILI and brown the SPARE RIBS in batches. Pour off some of the oil, retain about 2 tbs.

Return all the RIBS to the wok, pour enough water to cover and bring to a boil. Reduce the heat and cover. Simmer for about 1 hour, or until the meat shrink slightly on the bone and feels tender. 

Remove the CHILI and discard, pour the SAUCE into the wok. Simmer for 25-30 minutes until liquid is reduced. 

If necessary, add a mixture of 2/3 cups water and 1 tbs cornstarch to thicken the sauce. 

Serve on a bed of white rice.  


Thursday, June 27, 2013

Whoop! Whoop! For Some Vanilla Whoopie Pie!!!

Soft vanilla sponges, filled with a rich chocolate buttercream. Serve these babies with a large mug of brewed coffee in the morning for a special treat to love ones. Surely, these could earn you some few brownie points to spend on some shopping spree. 

The cake in itself id good enough to eat, if you dont have the recipe for the filling, I suggest just adding 2 cups of chocolate chips, or shavings into the dough for some easy bake cookies.

If you can pipe the filling with a swirled tip, it would be cosmetically appealing. However, I cant seem to find mine. 

1 stick = 1/2 cup 

INGREDIENTS :

2     cups      All-Purpose Flour
1     tsp         Baking Soda
1/4  tsp         Salt
11/2 stick      Butter
3/4  cup        Sugar
1     large      Egg
2     tbs          Sour Cream
4     tbs          Milk


PROCEDURE : 

Preheat the oven to 350'F. Line 2-3 large baking sheet with parchment paper.

Sift together FLOUR, BAKING SODA and SALT.


Whip the BUTTER and SUGAR using an electric mixer fitted with a paddle attachment (or with a wooden spoon) until pale and fluffy. 

Add the EGG, VANILLA EXTRACT, followed by half of the flour mixture

Add the SOUR CREAM and MILK. Stir in the rest of the flour mixture until thoroughly incorporated.

Pipe or spoon the mixture into the prepared baking sheet, spaced well apart to allow spreading. Bake for 10-12 mins or until just risen and firm to the touch. Let cool for 5 minutes, then transfer to a wire rack.


BUTTERCREAM FILLING

4    oz           semi-sweet or milk chocolate
1    stick       unsalted butter
1    tbs          heavy whipping cream
1    tsp          vanilla extract
1    cup        confectioner sugar


Place the CHOCOLATE in a heatproof bowl set over a saucepan of simmering water, and heat until melted. Set aside to cool, stirring constantly.

Beat the BUTTER with an electric mixer fitted with a whisk until pale and creamy. 

Incorporate the HEAVY CREAM, VANILLA EXTRACT and MELTED CHOCOLATE.

Sift the CONFECTIONER SUGAR into the butter mixture 1/4 cup at a time. Sifting the sugar is a key component in producing a smooth filling. 

To assemble, spread or pipe the cream filling on the flat side of the cooled cake. Topping with the other half when finished.

Sprinkle with some CONFECTIONER SUGAR before serving.


Thursday, June 20, 2013

All American Steak Dinner

Steak dinner has never been popular in my kitchen. I could never finish a medium sized slab with all the accompanying sides it goes with. Nevertheless I still attempted to cook some steak for dinner and it was (thankfully) successful. I would say that the side dishes turned out more successful than the steak it self. 

The meat I used was BONELESS RIB EYE, although Filet Mignon is the best cut. But since I am not the best person when it comes to steaks, I was awfully scared of wasting such an expensive cut of meat.  I used a pan grill since the grill outside needs some cleaning and my two boys were getting hungry. I cooked on both the sides first before working on the steak. 


INGREDIENTS:

Mashed Potato 

3              Extra Large Russet Potatoes 
3     Tbs  Butter
1/2  Cup Heavy Cream
Salt & Pepper


Cook the potatoes with skin on. The skin just rubs of when the potatoes are cook. I usually quarter the potatoes, and try to make sure its all the same size. Cook until tender.

Mash the potatoes and combine all the others ingredients until desired texture has been reached.

Mashed Potato Gravy

3     Tbs    Butter
2     Tbs    Flour
1-2  Cups Beef Stock
1/2  Cup   Heavy Cream
Salt & Pepper 

On low heat, melt the BUTTER and add the FLOUR. Whisk the mixture and add the BEEF STOCK and HEAVY CREAM. Continue stirring until desired thickness is reached. 

Pearl Onion with Mushroom

2 Cups    Pearl Onion
3 Cups    Button Mushroom
3 Twigs   Fresh Thyme
3 Tbs       Butter
1 Tbs       Olive Oil
Salt & Pepper


Peel the PEARL ONIONS by cutting both ends and soaking them in hot water ( The water from the potatoes can be used) for 2 mins. 

Melt the BUTTER and add some OLIVE OIL. 

Saute the MUSHROOM, PEARL ONION, FRESH THYME and SALT & PEPPER, until brown.

Place both sides in the oven, heated in 200'C until ready to be served. 


Thursday, June 13, 2013

Parmesan Crusted Tilapia with Balsamic Asparagus Side


I have been looking for a go-to fish dish in quite some time. A dish that I would be able to recreate when called for, but most importantly the dish can be prepared fast. I found this recipe in one of my old recipe magazine and made some major changes on the recipe. I have to say, this is beginning to be a fan favorite for my family. 

INGREDIENTS

For the Tilapia : 

1/2  Cup    Grated Parmesan Cheese
3     Tbs     Softened Butter
3     Tbs     Sour Cream
2     Tbs     Fresh Lemon Juice
1/4  Tsp     Dried Basil
1/4  Tsp     Salt and Pepper
1/4  Tsp     French Onion Dip Powder

4 medium Tilapia Fillet


Wash and Dry the TILAPIA FILLET and lightly sprinkle with SALT & PEPPER.

Combine all the other ingredients in a bowl until creamy and set aside.

Line a baking dish with aluminum foil, greased lightly with OIL. Place the FILLETS and the BAGGED ASPARAGUS (recipe below) on the top of the oven, a few inches from the broiler.

Broil for 4 mins on one side. Flip the FILLETS and broil for 3 mins.  (Leave the Asparagus Alone)

Spread the CRUST MIXTURE on top of the cooked TILAPIA FILLETS and continue broiling for 3 more mins, or when golden brown. 

Let cool for 2 mins before serving. 

For the Asparagus:

3       Cloves   Garlic
1/2    Small     Onion 
2       Tbs         Olive Oil
1       Tsp         Balsamic Vinegar
1       Bundle   Asparagus


Mince the ONION and GARLIC. Combine all the other ingredients in a bowl.


Wash and trim the ends of the  ASPARAGUS by holding both ends and bending it until it snaps, discard the lower half. Then add to the oil mixture for 5 minutes.

Place the coated asparagus in the middle of a square aluminum foil, and fold into a pouch, just like the picture. Cut 2 small holes on top of the aluminum pouch. 


Wednesday, June 12, 2013

Trimming the Blog

Ive currently trimmed the blog and my post by miles. Ive decided that this blog will cater to recipes, food, home innovations and crafts ALONE. Ill be transferring the fashion aisle to a different blog which Hopefully will be posted soon!

Presto Chicken Pesto

I have been late on the bandwagon for tasting some delicious pesto. Back when I was a child, I always cringe on the thought of eating a "green" sauce. Not because of the green vegetable concept but because of the oiliness that I have never been keen to love. However, I have been lucky enough to try a chicken pesto sandwich which I fell in love with. Then came the obsession of finding a good enough sauce recipe for a my one true love, pasta. I think in the past years, Ive made a dozen variation of chicken pesto sauce. This by far has been the best pesto recipe Ive conjured up with. Although I will edit the post if I made some few tweaks here and there. 


the basil is the crucial part of the pesto, some likes the full grown basil leaves. However, I do love the after notes of baby basil leaves, it leaves a sweeter after notes compared to the mature ones. Although the normal basil leaves that you buy in your grocery store while suffice. The recipe also calls for some left over Rotisserie Chicken. I found rotisserie chicken to be the most flavorful for the pesto. Moreover, this recipe could easily be done within 30 minutes, or even less if all the ingredients are prepared in time. 

COOK NOTES: This pesto doesn't include pine nuts although you can definitely add 1/4 cups of pine nuts if you desire.


Ingredients : 

2     cups     Baby Basil Leaves. (washed)
3     cloves  Garlic
3/4  cups    Extra Virgin Olive Oil
1/4  cups     Parsley (washed)
1/2  cups    Parmigiano Reggiano
2     tbs       Sour Creme

Salt and Pepper 
Left over Rotisserie Chicken
Pasta


Cook the pasta and save about a mug full of pasta water.

Combine all BASIL, PARSLEY & GARLIC in a food processor while continually dripping the OLIVE OIL. 

Add the PARMIGIANO REGGIANO and S&P

Transfer the PESTO SAUCE to a skillet with the pasta, turn the heat to low and add the shredded or cubed  CHICKEN. Add the SOUR CREME at the end, adding some extra creaminess to the dish 

Serve while warm, and topped with some parmigiano reggiano. 


Friday, February 1, 2013

Voulez-vous une Èclair, Mon chèri

Since Ive watched the movie Certified Copy and followed by Ratatouille, I have been feeling like a little french girl craving some awesome and oh-so-delicious pastries... When I say craving, I mean my mouth starts watering just by thinking about it... The pastry of choice was an Èclair, and not the store bought gigantour you see in your grocery aisle, which in fact would make a french pastry chef, gasp in horror, making him faint on the spot. There is nothing worst than a grocery-bought èclair, (unless you're living in France) seriously, who makes a 6 inches pastry, and call it an èclair? Especially when the chocolate isn't properly tempered and the custard seemed like it came in powder form.

I was craving for the authentic french èclair, made with Pàte à Choux and Crème Pâtissière and a properly tempered chocolate. So Ive been on the quest for the perfect èclair for about a month now. The biggest problem I found was the Choux, it keeps on deflating on me after I start cooling them and if I cook them any longer they burn. I basically had to perfect baking the Choux, before I could even start with anything else. I found out that, to be completely exact, you had to measure the Choux by weight and not by cups. Oooh the French, how they make everything seems a little bit more compliquè. Although they did refine pastry making so you gotta hand them that.

This Choux recipe, just like the French are a bit temperamental. If your oven wasn't calibrated recently you have to do a trial and error on the baking temperature, but dont fret, the recipe was made for some trial and error.

CAUTION: This recipe might produce some heartache and frustration that could make you stop baking for a couple of days.

Pâte à Choux Ingredients
Letting the Chocolate Set

125 g       Whole Milk
125 g       Water
110 g       Butter
10   g       Sugar
2     g       Salt
140 g       Flour (Sifted)
4              Extra Large Jumbo Eggs (use 5 if you have medium size ones)

Preheat the oven to 425'F. This was the case with my oven, because 400'F temperature deflates my choux, if your oven run high

Place the MILK, WATER BUTTER, SUGAR and SALT in a heavy saucepan, and bring to a simmer. Whisk the mixture to incorporate the butter and milk, so no distinction can be seen. Turn off the heat.

Dump all the FLOUR and whisk vigorously, and when I mean vigorous, I mean mix it like your happiness depends on it for 30 seconds. Which in my case it did at that moment in time. This is the only time you can remove the lumps of flour. Once this sets, you have to start again.

Once your mixture is set, place it back on the stove with low heat on. and keep stirring for 2 minutes or until the Choux forms into one complete mass.

Transfer the Choux into a mixer fitted with a paddle attachment, and set on low, cool the choux for 30 seconds. *(you can do this all by hand if you wanna burn some calories to reserve some space for the èclair.)*

Add the EGGS one at a time, waiting for each one to be fully incorporated into the Choux. Stop the mixer and wipe the sides and the bottom of the bowl and mix. Add the additional eggs.

The consistency is key to the Pàte à Choux, Once all the eggs are added, lift the paddle and a V shaped ribbon must flow.

Place the Choux into a pipping bag fitted with 1 inch hole.

Pipe 3-31/2 inches onto the baking sheet, staggering the èclair to give them room to rise.

Bake at 425'F for 15 mins and Reduce the heat to 325'F and bake for 25 minutes. Do not even attempt at opening that door while the èclairs are baking.

**While the Èclairs are baking you can make the Crème Pâtissière **

COOLING THE ÈCLAIR: Place a wooden spatula to prop the oven door open and leave it to cool for 20 minutes.


Crème Pâtissière Ingredients (Custard) 

1       Cup Flour

1/2    Cup Sugar
1/4    Tsp  Salt
3       Cup Whole Milk
4       Egg Yolk
3       Tbs Unsalted Butter
2       Tsp Vanilla Exttract

Combine FLOUR, SUGAR, SALT in a heavy saucepan over moderate heat. Gradually add the MILK to the dry mixture. Continue whisking the mixture until it thickens.

Set the electric mixer fitted with the whisk attachment on medium speed. add the EGGS and ladle the white mixture a little at a time. Be very careful while doing this which could scramble the eggs if you put the hot mixture too much too fast.

Once the mixture is fully incorporated with the eggs, place the mixture back in the saucepan set on low heat.

Add the BUTTER and VANILLA and continue whisking until the mixture thickens.

I stop when the imprint of the whisk disappear in 4-5 seconds. Don't over thicken the custard.

A custard should have a velvety texture and melts in your mouth easily.

Cool the custard by placing it in a bowl and putting a plastic wrap on top to prevent the formation of skin.
Set at Room Temperature

Fit a pipping bag with a metal spout, filled with the custard and poke a hole on the middle of the cooled èclairs and filling them with the velvety custard.

Dip the top of the èclair on a properly tempered chocolate. A properly tempered is the key to this delicious èclair. If your chocolate wasn't tempered properly it wont ever set, and might possibly be grainy. Im getting dizzy just thinking about it... You wont have that glean on your chocolate and that oh so delicious SNAP! once you bite into them.

Heres an article for properly tempering your chocolate: How to Temper Your Chocolate.


How To Temper Your Chocolate.

Tempering chocolates isn't really that hard once you get the hand of it. Possibly trying to make it a whole bunch also helps.

A properly tempered chocolate will have a shine to them once melted, and its finger licking good if you ask me. Additionally, once set, the chocolate will have a distinctive SNAP! if you bite into it. On the other hand, a chocolate that was heated too much, will crumble than break cleanly. So why are chocolate so temperamental? Here's the science bit, so if youre not so keen on "knowing" why chocolates have to be tempered, look away... Tempering chocolates has something to do with the Beta crystals arranging properly, when chocolate is melted and cooled, there are 6 forms it can crystallized into. Unfortunately only the Beta crystallized form will give you the shiny and sharp snap that a properly tempered chocolate look like. The Beta crystals are VERY dependent on the temperature the chocolate melts in. Too much heat, and the Beta crystals are unable to form giving you either a streaky, grainy chocolate. Which in fact will never set in room temperature and will possibly bloom. *Bloom- those white-ish streaks.

Are you still there?? I hope so because here comes the fun part...

Chop your chocolates into smaller pieces, smaller pieces are easier and faster to melt

Place a glass bowl on top of a LOW simmering water.  Make sure the saucepan has no spout, melting chocolate hates moisture and if significant moisture comes in contact while its melting, it can seize on you. SEIZE- this means when the chocolate gets hard and will not melt no matter how high the temperature becomes.

Place 2/3 of your chocolate on the bowl and stir it continuously, melting chocolate loves to be stirred gently.

The temperature varies from dark, milk and white chocolate. Although if you search the web they will tell you to get a candy thermometer, and the temperatures given by different authors are also different. I only get my temperature to 109-110'F. I know some people say 115'F or lower but you have to give the thermometer some doubt for manufacturing error, 110'F is the safe point.

Once the chocolates melt, remove it from the heat and wipe the bottom of the bowl. Place 1/3 of chocolate and let it melt from the heat of the melted chocolate. Stir gently for 2 minutes.

Place the chocolate back on the heat, and with stir for a minute or so.

Voila! Perfectly tempered chocolate!

If this is your first time tempering chocolate, I suggest you do some further research.

The main brands of chocolate I always use are:

Guittard : I am i love with this chocolate, even more so than Ghirardelli. I think you can but the chips for cookies on Albertsons, or Winco. Although for baking chocolate that has to be tempered, I order it from them which cost about $80 for 8 pounds of 61% Cacao Semi-Sweet chocolates.

Another brand I really love is Callebaut its marketed about $70 for an 11 pounds Semisweet chocolate block.

I always say a fine chocolate makes a fine day. I know these chocolate seems to be on the expensive side, but its worth it and they do last for a while. So Happy Tempering!


Wednesday, January 30, 2013

Home made Soy Milk

For the past few days, I've been slaving myself because of my craving for some soy milk. The soy milk they sell in the local department store doesn't seem to compare to the soy milk I grew up drinking back home. The soy milk here taste like a whole bunch of chemical was added into it, AND I could taste the soy bean skin, which and most probably wasn't peeled before they ground it up and boil it.

I only made Soy Milk 3 times in my lifetime, the first one was a success, a complete dupe of the authentic soy milk they sell back home. Unfortunately, the other one was a bust, why you may ask? I did not peel the skin of the soy bean which produced an awful smell, and taste. This was the time I knew that most of the brands they sell in the large department stores are not peeled, or isn't completely peeled anyway.

This recipe I must admit is quite easy on the pocket. And doesnt taste like any store bought soy milk out there. Here in the US anyway. I bought a big bag of Soy Beans in a Chinese grocery for $3. And you'll only need about 1/3 of the bag for half a gallon of Soy Milk.

**If this is your first time tasting this kind of Soy Milk just try to make a small batch**

Place 5 Cups of Soy Bean in a large container filled with a lot of water. Soak the Soy Bean overnight, and you will notice they expanded twice their original size. Discard the water and fill with clean water again.

Soaked overnight.
This comes the meticulous part. I would suggest doing this when you're bored and have a couple hours to spare. Think movie marathon? Or even better... FRIENDS marathon.

Peel the skin from the bean, you just basically pinch them and the Soy bean will pop out. Once you get the hang of this, its pretty easy... I said easy not fast... It took me 2-3 hours to peel them and I didn't even get them all, which my OCD self was screaming inside, but my fingers were tired... and wrinkly. Although time passes by when you're watching some FRIENDS episode and laughing at Ross.

Constantly discard the water when its starts looking white-ish and you starts smelling a beany smell. Don't worry if you crush or split the bean in half, this actually makes things easier to spot.

Look at all those skins.
Discard the skin and some beans that didn't expand or take in water. Don't worry about not peeling ALL of them, its nearly impossible unless you have some Asian army behind you, I left mine back in Japan, so its my bad-luck. That's my mom and sister by the way. They are all the army I need.

Place 2 cups of soy bean in a blender with 3 cups of water and transfer them to a deep pot. Do this until all the bean are pulverize. Place about 2 L of water and let it come to a simmer, remove the foam on top.

Be very careful with this, it tends to over boil and flow out causing a BIG mess in your kitchen. so Stir...Stir...Stir...

Add 3-4 Tbs of DARK BROWN SUGAR and 1/2 Cup of milk. But you can always adjust the sweetness to your preference. Taste the soy milk and if it pleases your fancy. Turn the heat off and strain it with a CHEESECLOTH placed on top of a strainer over a pitcher. Please don't just use a fine strainer, it just doesn't work as well as even I would hope.

If you're happy with the taste you can just wait to let it cool and place it in the refrigerator,

If its too bland: Reboil the soy milk in a clean pot until it reduce to the desired taste.
If its too strong: Just add some water to suit your taste

Pork Anyone?

There are days when I want to be grand in the kitchen but yet become very lazy to do so... Therefore, I tried working on my plating skills which is improving, if I may say so.... I've been in the process of making some homemade soy milk and feeling like the Asian girl that I am, I just had to pair it with some Chinese Braised Pork Belly. All I needed was to learn to make some Mantou bread and (maybe?) some Chinese grandma out there might be proud of me. But before I harness all other Chinese culinary technique, Ill settle for this tonight.


Ingredients

1    Slab of Pork Belly
2    Tbs Vegetable Oil
1    Cup Soy Sauce
3    Cup Water
3    Tbs Xiao Shing Wine
3    Tbs Dark Brown Sugar
5    Cloves of Garlic
3-4 Star Anise
6    Peppercorn
1/2 Tbs of Garlic Powder
1/2 Tbs of Onion Powder


Cut the PORK into 3-4 equal portions. Depending on the size of your slab. OR you could always cut the pork into cubes if you so desire.

In a deep pot, add the VEGETABLE OIL. When the oil is hot, sear the pork skin side down.

Add the GARLIC, SOY SAUCE, SUGAR, XIAO SHING WINE and WATER.

When the sauce begins to boil, add all the remaining ingredients. Bring to boil.

Put the lid on and reduce the heat to medium low.

After 2 hours. Ladle some of the sauce to a medium sauce pan and add 1 tbs of FLOUR mixed in 1/2 a cup of WATER to thicken. Stir for 3 minutes.

**All the ingredients here can be customize to fit the diners palate. So feel free to be a loosy-goosey on this one**

Serve on a bed of white rice and sprinkle some scallions or green onions on top.

Friday, January 25, 2013

Roasted Chicken

It seems like there is a concept of roasting a chicken as a daunting task. Reserve for special occasion that  calls for a "difficult" recipe. However, roasting a chicken in the oven is far from that. In actuality it is one of the easiest recipe I have ever done. No need to stay in front of the stove, stirring continuously. Once popped in the oven, you just leave it. Unless you want some sides. Although this recipe also takes care of that cooking in the oven. Also, this is a one pan type of cooking which I love, since I'm the one who washes the dishes here, I always prefer one pot recipes. Allow at least 2-3 hours of cooking and prep-time for this recipe.


Ingredients

4-6 Lbs Whole Chicken
3 Medium Onions
3 Bulbs of Garlic
3 Lemons
3 Medium Size Carrot
4-5 Medium Potatoes, 
1/2 Cup Butter (Melted)
Salt and Pepper
Dried Thyme


The day you're going to cook the chicken, sprinkle it with KOSHER SALT. This actually suck some of the moisture out of the skin and flavor the skin as well. 

** Before everything, make sure the chicken cavities are cleaned.**

3 hours before dinner... PREHEAT the oven to 420-425'F

Sprinkle KOSHER SALT and PEPPER on the cavity of the chicken, Cut the GARLIC BULB, 2 LEMONS and "shove" them inside the cavity as well. Tie the CHICKEN legs with twine to pull them together. and tuck the wings under the chicken.

Dry the CHICKEN with paper towel, making sure the skin is fully dry. This will ensure that the skin will brown because excess moisture has been taken away from the skin.

**I used a 9x13 casserole dish. The pan youre using musn't be too big, this will cause most of the vegetable to burn and wont circulate the heat properly.**

Cut the ONIONS into strips and place them on the bottom of the dish, place the chicken, making sure to tuck the wings under. Peel and Cut the CARROTS into thirds and spread them around the chicken, doing the same thing for the POTATO as well. Break the GARLIC BULB into individual cloves. There's no need to peel the skins of the garlic since it will be easier to remove them once cooked. 

Cut a LEMON in half and squeeze the juices around the vegetables, sprinkle some SALT & PEPPER

For one last time, dry the chicken, brush the melted BUTTER on the chicken, the butter will also ensure further browning of the skin. Sprinkle SALT&PEPPER and THYME on the skin. And just spread the excess melted butter around the vegetables. 

Bake for an hour and 30 minutes. Using an internal thermometer make sure the chicken reach 165'F-170'F.

**If you dont have an internal cooking thermometer, it is a cooks note to stick a steak knife between the thighs and if the juices runs clear then the chicken is cooked through. This technique comes from the knowledge that the thigh of the chicken is the thickest and takes longer to cook. Although you have to make sure that you stick the knife deep enough.**

Take the chicken out from the dish and cover with aluminum foil. Letting it rest for a good 30 mins. This lets the juices mellow and prevents the chicken for drying once cut. 

Meanwhile, put the vegetables back in the oven and reduce the heat to 400. Stirring them occasionally. 

If you happen to cook the chicken too early and no ones in the house is ravishing, reduce the heat to 250-300'F and place the chicken back on the dish and cover with aluminum foil with holes in them. 

Serve and enjoy. 

Thursday, January 24, 2013

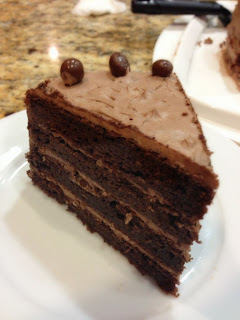
Coffee-Chocolate Cake Recipe

Ever since I've started baking I've always added some coffee or an extract of it on most of my chocolate recipe. So venturing out and experimenting to bake a coffee cake wasn't much of a task. Although, the reason for most of my measurement was in tablespoon was because I was experimenting with this recipe the whole time. But I do promise to find the time to convert the measurements into cups and refine the flavors when I make my second batch.

CAUTION: This coffee cake recipes are only for coffee drinkers, enthusiast and a-like. The taste of the coffee was pretty strong on this one. Although you can reduce the amount of coffee on the recipe.


Ingredients

Batter

10   Tbs All-Purpose Flour
8      Eggs
8      Tbs Cocoa Powder
2      Tsp Baking Powder
12    Tbs Sugar
8      Tbs Vegetable Oil
2      Tbs Instant Coffee Powder
8      Tbs Buttermilk

Prepare 4, 9 in cake pans. (Buttered and Floured) and PREHEAT the oven to 350'F

In two bowls, separate the EGG YOLKS from the WHITE. Making sure that none of the yolks breaks. 

TIP Eggs are easier to separate when cold, but you have to let it come up to room temperature before using.

In an electric mixer fitted with the whisk attachment, whisk the EGG WHITES until soft peaks forms.

Meanwhile, in a bowl, combine SUGAR, EGG YOLKS, VEGETABLE OIL and BUTTERMILK. Whisk until blended

In a different bowl, combine FLOUR, COCOA POWDER, COFFEE POWDER and BAKING SODA.Slowly pour the Dry Ingredients to the Wet Ingredients. Making sure not to over-stir. 

Fold the EGG WHITES carefully into the batter. 

Divide the batter into 4 equal parts. Bake for 20 mins or until inserted toothpick comes out clean.


Let cool in the tin for 10 mins, then carefully move the cake to a wire rack.


Mocha Frosting

1 1/2 Cup Butter
4        Tbs  Instant Coffee Powder
2        Cup Powdered Sugar
4        Tbs Cocoa Powder
2        Tsp Vanilla Extract
2        Tbs Heavy Cream


In an electric mixer fitted with a paddle attachment cream the BUTTER until pale and fluffy. 

Add the COCOA POWDER. Then add the POWDERED SUGAR 1/4 Cup at a time. 

Dissolve the COFFEE POWDER in the HEAVY CREAM. Add the coffee mixture and the VANILLA EXTRACT to the butter mixture. Whip until fluffy. 

* The Butter must come to room temperature before being whipped. 

Monday, January 14, 2013

Korean Bulgogi Fusion Recipe from Bop N Grill

The place is a fusion of East meets West. That is the exact phrase to call it, where else will you find a Bulgogi Philly Cheese steak, which I've added into my long list of foods to try. If you wanna check out BopNGrill, its in Chicago, on Sheridan Road, between Albion Avenue and North Shore Avenue.


Ingredients

Rib Eye Steak Cut thinly
One small Asian Pear
1/2     Cup of Canned Pineapple
1 1/2  Bulb of Peeled Garlic
1/2     Cup Mirin
1/2     Can Sprite
Carmelized Onion
Scallion
Salt and Pepper
Red Pepperflakes
3 Tbs   Sesame Oil
1 Tbs   Sesame Seeds

Blend everything together in a blender. Transfer everything to a big bowl with 3 cups of Soy Sauce, 4 Tbs of Brown Sugar. Add the meat, 1 sliced onions and julienne carrots.  Marinate for couple of hours or over night, which ever you prefer. 

Heat up a skillet with a 2 Tbs of oil. Set the heat to medium-high. Place at least a cup of the meat on the pipping hot skillet. * Make sure to squeeze the marinate out. Another alternative is using a colander. Toss and turn until the meat is tender. 

Serve with a small drizzle of Sesame oil, with sesame seeds and scallions. Placed on top of hot white rice.

  *This type of cooking will be very messy and prepare for splatter everywhere. I found this recipe is best to do the day you are planning on cleaning your stove.